This is a great way to obtain seeds for free from seed suppliers (usually random seeds as a thank you for purchasing from them or as a request to be part of whatever trial they are doing that year. You might have to spend a certain amount on other seeds to be eligible)
NEW for 2023:
Tomato (Plum) Alfresco - Worth £2.60
A heritage variety, tolerant of cold or variable temperatures, making them ideal for northern climates. We loved this variety when trialling! This determinate variety can be grown outside or in the greenhouse.
Not a lot of people know that D.T. Brown has a small presence in Australia, we’ve been selling seed there for over 25 years! For almost as long, they’ve been raving about carrot Topweight which is their most popular variety. It’s a late maincrop carrot with long tapering roots, a crisp crunch and lovely flavour. It’s also extremely reliable and resistant to bolting, so we thought you might like to trial it this season to see what all the fuss is about!
1000 seeds FREE with every seed order.
Seed trials are a way of sharing seed to gardeners across the country to determine their growth and eating (or floral) qualities in a range of locations. If you volunteer (rather than be gifted) to join one of the trials, you are committed to following the growing instructions and reporting back to the supplier. Back in 2009, the RHS asked for volunteers to trial 2 varieties of pea (mange tout and a sugar snap) for free and I put my name down (you had to register as a member) The seeds on this occasion were supplied free by a reputable seed supplier so I had more than I needed for the trial and was happy to share with some of my fellow allotment neighbours, but the results were sent direct to the RHS:
sowing dates
sowing conditions
soil type
date seedlings appear
date of first flowers
date of first pickable pods
height of plant at harvest
weight of total crop from one plant
list any pest problem
list any other problems
comments on crop quality
Despite the strict rules, a group of us had kept in touch with the progress of our trials and it was great to learn how we were all getting on and our opinions. It was quite exciting being part of the trial. Considering I had never been particularly fond of mange tout or had ever heard of sugar snap, the 2 varieties became a firm favourite of mine thereafter. The RHS seem to have changed the rules though and now charge for orders - I don't know what this entails (you have to log in) but if interested, please click on this LINK to take you to the RHS Members' Seed Scheme (note the deadline for ordering the seeds ends on the 28th February 2023) and how to join:
RHS Members’ Seed Scheme 2023
In line with our move towards more sustainable operations, the RHS Seed Scheme in 2023 will be offered online only as we seek to reduce our paper-based systems.
Ordering seed packets
Members can order up to 15 packets of seed from RHS Gardens including annuals, herbaceous perennials and rare shrubs from 1 December 2022 to 28 February 2023.
It’s quick and easy to order your seed packets online by logging into your My RHS account. If you don’t have one, you can create an account and link your membership in just a few minutes.
Cost
A charge of £10 is applied to all orders which covers the cost of seed collection, administration and postage.
Delivery of orders
We began to dispatch orders for the 2023 Seed Scheme in December 2022 to addresses in the UK only and aim to send out all orders by the end of March 2023.
Please note: Due to the change in export regulations governing the sending of plant material overseas, we regret that we can no longer offer RHS seed to our EU members.
Although not a free seed trial, we did go on to have a competition of our own just for fun - growing a particular chilli which resembles a rather rude looking fruit called Peter Pecker. Suffice to say, there was a lot of laughter as we shared photos of our chillies. The point is that with sharing our efforts, it kept the interest in gardening going.
lancashire lass wrote: ↑03 Feb 2023, 09:37
Hybrids do have their place and research have produced many that we can grow today. When you see a variety with "F1" tagged on to its name, for example, carrot variety Flyaway F1, this is due to cross pollination of 2 specific varieties which produce carrots that are less likely to attract the carrot fly. Hybrid seed tend to be more expensive than heritage seed due to the extra effort of ensuring that particular cross pollination.
F1 stands for 1st generation. Mendel's worked on peas that were crossed from 2 lines of peas which had been selected over several generations for height. One tall and one short, the cross has 1 tall gene and 1 short and because the tall gene dominates the F1 peas were tall. But because of the short gene when they seeded 1 in 4 would have 2 copies of the recessive gene, and be short.
So F1 hybrids are very uniform but their F2 offspring are variable
Mo wrote: ↑03 Feb 2023, 12:44
F1 stands for 1st generation
The "F" is actually from the word "filial" which is basically the same as saying First generation (related offspring from that cross):
The filial generation comprised of offspring(s) resulting from a cross between two individuals from parental generation
I remember learning about Mendel's pea experiment in school and having to write out the parent (P) cross followed by the 4 options (F1) and the options in the 2nd generation (F2)
Mo wrote: ↑03 Feb 2023, 12:44
So F1 hybrids are very uniform but their F2 offspring are variable
Sowing seeds is not that difficult but you are encouraged to read the sowing instructions on the seed packet or supplier website carefully.
First - try to sow seeds at their optimum germinating temperature. Although most seeds will germinate between 10 - 15oC (soil temperature), some need much warmer temperatures between 20 and 25oC. So try to avoid sowing too early in the growing season - most "cool" weather crops will respond quickly to the spring warmth but warm season crops tend to sulk if sown in compost / soil that is too cold - either they take so long to germinate, you never know if they will or not, or they sit in damp soil for so long, they are at risk of rotting (not to mention that the compost surface may have developed a matted algal coating making it difficult for some of the smaller seedlings to push through)
Second - a tip about using compost / mixes in pots or seed trays. Never firm the compost down with your hand or fingers prior to sowing. You should instead loosely fill and then tap the pot (or tray) hard on to a sturdy bench so that the excess air is knocked out without compacting the compost. This will ensure better drainage of water, the roots are able to spread out quickly and growth is not checked.
Thirdly - warm the compost up before sowing. If your bags of compost are stored in a cold shed, bring it indoors and leave it for a few days to reach room temperature. For warmth loving plants, find a warm place
Fourthly - dampen the compost BEFORE sowing. After spending so much time preparing the seed tray and sowing, there's nothing worse after watering to find the compost lifted up and then as the water drained, the soil / compost shifted and exposed the seed requiring a little remedial work afterwards. Depending on the state of the compost (it may be wetter or drier than expected), use just enough water (or none) for the compost to be damp (a pump sprayer may be better or use a small / indoor watering can which is easier to manhandle. The compost should be damp BUT NOT WET - if you were to press down on the compost and water oozed out of the pot drainage holes, then it is too wet.
Talking of water - never use the freezing cold water direct from the water to water seedlings as this will shock them (to the point they might die) but instead fill the watering can or other container and leave it at room temperature for a few hours first.
Using propagation lids or placing seed trays inside a plastic bag will help to retain moist warm air (humidity) and encourage germination. Be careful of leaving the seed tray in the sun with the lid on for too long - it can actually get too hot for some seeds so consider opening the vents or moving the tray away from the sunny position. Like-wise, the mini greenhouses that are often on sale in supermarkets or diy stores in spring when most people start to think about gardening, can get extremely hot when placed in direct sunlight ... many a seedling has got cooked in the hot greenhouse ... so remember to open the doors. Even the large (shed sized) greenhouses can get too warm during late spring but the temperature can be better managed than the tiny cheap ones.
Finally - if you don't have enough sunny windowsill space to encourage germination (the sun on the damp compost will warm it up quickly), nor have the benefits of greenhouse, there is a little trick which I learned from some other gardeners which you won't see in any gardening book ... Have you ever noticed especially in late spring when the sun's strength is on the increase even though there might be a bit of a chilly wind, the inside of a car gets warm very quickly. When I sowed seeds of warmth loving plants like squash including courgette, beans and sweetcorn, I'd put the trays into the boot of the car and leave the car in a sunny position (especially when driving it to work) so that it heats up. The seeds germinate very quickly so do keep an eye out. The downside is that you do need to bring the seed trays back indoors in case of overnight frosts (if night temperatures don't drop too low, you could leave them in the car but after warming up the compost during the day to encourage germination, it makes sense to bring them indoors to stay warm)
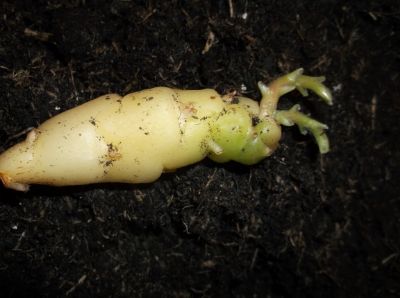
Chitting has been mentioned a few times in some earlier posts and is particularly useful when growing chilli, parsnip and sweetcorn seeds - this is basically priming a seed to the point where it starts to grow and the root breaks through the outer casing. It is a very useful technique to avoid wasting precious compost in case the seed fails to germinate. Once the root appears, it is very important to carefully transfer the seed to a waiting plant pot filled with compost (or ground in the case of parsnip) To encourage the seed to continue germinating, try to ensure the compost (or soil) has been warmed up to at least room temperature, to prevent growth from being checked and risk failure of the germination cycle.
Something you may not have heard of is scarifying. To be fair, most vegetable seeds do not need to be scarified - this is about damaging the outer seed coating before sowing. Some seed coats are so hard that it hinders germination - seeds like sweet peas germinate better if the seed is rubbed against something abrasive like sand paper to allow easier initial water uptake or using a sharp knife to nick the seed coat. To be fair, I have never resorted to scarifying seeds and even the most stubborn have eventually germinated.
The depth at which seeds are sown is very important. Some seed are so small that they actually won't germinate unless they are exposed to light. These seeds are thinly spread out on the surface of the damp compost (better to dampen it BEFORE sowing otherwise the water will lift them and after drainage, several seeds may clump together making it difficult to thin out later) Place the seed tray on a sunny windowsill to encourage germination. Ideally place the seed tray in a plastic bag (try not to let it lie on top of the soil / compost surface) or cover with a propagation lid to keep the warmth / humidity high.
Other seeds tend to be planted deeper as the size of the seed increases. So seeds like cabbage, cauliflower, broccoli, turnip, radish or swede (all the seeds in the Brassica family look so similar, it would be difficult to tell the difference between them) can be sown on the surface of compost and then a thin layer of compost of up to a half inch is loosely sprinkled on top. When the seedlings have grown, hardened off and ready to be planted out, the plants can be planted much deeper than their original compost level (when it comes to large plants like the Brussel sprouts, the deeper planting hole will help to prevent them from toppling over during windy weather) All Brassica plants like to grow in firm soil so after planting out in their final positions, press the soil down firmly (in some cases, use your foot)
Carrot and parsnip should ideally be sown outdoors directly in their growing bed - if you try to "transplant" the seedling from a seed tray to the soil, they do not like disturbance and the root will not grow straight down as you would expect. Draw a seed row (you can even use your finger for this) in the soil surface to a depth of about a half inch and sow the seeds thinly (remember that when thinning seedlings out later in the growing season, you risk releasing volatile oils which will allow the dreaded carrot fly to find the remaining seedlings) and loosely cover with soil. You can try to grow parsnip indoors (after chitting) in long cardboard tubes (such as the cardboard inner of a toilet roll) filled with compost, and then plant the WHOLE thing (seedling and cardboard roll) into the planting hole in their growing bed. Beware though that the root grows rapidly and much faster than the top growth - just when you think the seedling is only just going past its seedling leaves and sprouting the first proper leaves, the root has already grown out from the bottom of the cardboard roll. Even with holding the cardboard roll in a deeper planting hole in the bed so that the roots hang down as you carefully backfill with soil, this root disturbance will still affect the final parsnip root shape. As a result, many of my "long" parsnip varieties have grown more like a swede and ball-shaped than like a parsnip (still a very tasty vegetable when lifted and cooked)
Seeds like sweetcorn can be sown to a depth of about an inch below the compost level. Like the Brassica family, when the seedlings are ready for planting out in their respective bed, the planting hole is deeper than the original compost level in the pot - roots near the soil surface will grow out from the plant stem and help to anchor the sweetcorn plant better from windy conditions.
Pea (seeds) are about the same size as sweetcorn so they too can be sown to a depth of about an inch below the soil surface. I preferred to wait for spring to start warming up properly and sow the peas direct in the beds they will grow in. Using a digging hoe, I liked to use it to rake a mini trench about an inch deep, then sow the seeds about 2 inches apart in a zig zag pattern. It's easier to see the seeds when popping them in the trench before gently raking soil over them.
There aren't that many vegetable plants which can be grown from cuttings - normally they are grown from seed and then fruits (like chillies, peppers, tomatoes, winter squash) are harvested or roots (carrots, swede, parsnip, celeriac) are lifted.
However, there are some quirky exceptions. You can grow tomato plants from cuttings of the growing plant which is quite useful if your seed sowing wasn't as successful as you'd have liked. The cut section can be placed in a jar of water until roots grow and then planted up. Bear in mind that there is a small window of active growth and fruit bearing before it becomes too late for fruit to ripen in time.
You can increase the number of potato plants by cutting the seed potato into pieces (or plant peelings - do make sure that the piece or peel has an "eye" from which the root and top growth will grow from) Unfortunately, there are lots of different potato plant diseases around which may enter cut entries and instead of a good harvest, end up with a disaster. It is not actively encouraged as a method of propagation. One way round is to let the cut ends dry off first before planting (most diseases are soil borne bacteria or fungus and the cut surfaces are wet and give easier access to the rest of the tuber) and / or dust with a sulphur dust to discourage fungal growth.
And of course, after harvesting (one seed potato will produce anything from 5 - 12 tubers), there is the potential is to grow these for the following year's crop. However, it is not something I would encourage as this is where potato viruses in the saved (uncertified) seed stock will decimate the entire harvest the following year (unless you live in Scotland where the risk is lower - most certified seed potatoes for sale in the UK are grown in Scotland)
And don't forget that garlic is grown from individual cloves so after harvesting, always save the best and biggest bulb to grow from the following year (only take the cloves off the bulb just before planting otherwise they will start to dry up)
Another allium is the humble and yet versatile shallot. I refer to the round ones rather than the "banana" shallots (which to be fair, I've not been all that successful in growing) - plant one shallot and in late summer / early autumn and you can have anything from 4 or 5 up to 10 shallots (4 or 5 are normal)
There are 2 more tubers which you won't see for sale in a UK supermarket - the Jerusalem artichoke and the New Zealand oca (or yam) - both of which produce a very good crop. The Jerusalem artichoke (aka JA) is often referred to as a "fartichoke" because unfortunately the fleshy bit (like a potato) is not made of starch but another carbohydrate called inulin. This is readily digested by gut bacteria which produces the inevitable wind (personally I didn't notice any difference so it might depend on what kind of diet you are already on) The JA is actually related to a sunflower and in summer will produce lots of small yellow flowers that do resemble a "wild type" sunflower, and the plants grow easily 8-10 feet tall (which branches out unlike the single stem sunflower we are familiar with) and are therefore best grown at the back or corner of a vegetable plot. The soil does not need to be particularly fertile and is one of those you can forget all about them until ready to harvest. The tubers are harvested in late autumn but can be left in the ground all winter after the plants have died back (all the sugars in the plant material are stored in the tuber until spring) As for cooking qualities, I wasn't struck with the boil or bakes but they made wonderful deep fried chips. The tubers in the ground are prone to slug damage.
The New Zealand oca or yam is related to sorrel, spinach and rhubarb. The tubers come in all sorts of colours from white, yellow, orange, pink and red and also size can be about as big as a hazel nut or up to the length (and width) of an adult's thumb. They are surprisingly easy to grow - they need reasonably fertile soil and do make sure they are well watered during summer. The trick to a good harvest is to wait until the first autumn harvests kill off the top growth - and then wait some more. If you try to lift up the tubers too soon you'll be disappointed as the tubers only start to bulk up AFTER the top growth is completely dead. The downside to growing oca is that they are slug food and in a wet season, a lot of the tubers are damaged. However, you do get quite a lot of tubers off each plant. To cook, they don't need peeling (give them a good scrub like you might do for early potatoes) I have to confess that my cooking was limited to roasting but I believe they can be eaten raw in salads.
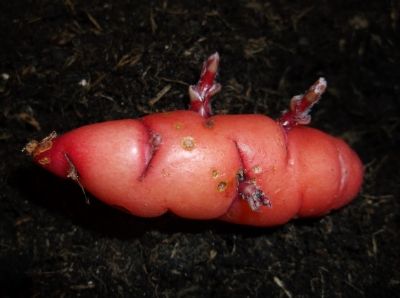
The photos below show the tubers after "chitting" them so that sprouting growths have appeared ready for planting:
(the oca plants growing in the sleeper bed in the foreground):
Once you have purchased and grown / harvested your first oca, always keep some of the best (and the biggest) to grow again the following year.
Another tuber worth mentioning is the Crosnes aka as the Chinese Artichoke. The only way to describe these tubers is that they have the size and shape of a soil grub ... they have a crunchy flesh which can be cooked or eaten raw. These do not need to be dug up before winter as the tubers survive well. Like all plants, they do best if the soil / compost is improved and the tubers are lifted and thinned out so that plants are not competing for the few resources like nutrients and water.
Be prepared to have to deal with "rogue" (the ones you missed harvesting) oca or crosnes tubers if growing in a normal vegetable bed. They can become almost a weed so it might be an idea to grow them in large containers (such as the acquired bath tub on the allotment plot) or a dedicated raised bed.
Strawberries are probably one of the few plants that I actually propagated from - when they send out runners, gently pin the end with the leaves down in contact with soil and it will quickly throw out roots. When big enough to handle, cut the runner from the main plant and transfer to a new growing location (or pot on)
Another one is the rhubarb crown - after many years growing in the same site, the crown (the root mass just under the soil surface) needs to be lifted up and split. It is best done when the plants are still dormant in winter but just before spring. You need, preferably a narrow width, spade though any spade will do, then check that each portion of the crown split off has a leaf bud or two. Use your foot to apply force to the space to slice into the crown. Dig in lots of manure / compost into the planting hole (rhubarb, being a leafy plant, need a lot of nitrogen feed)
You can usually tell when rhubarb needs to be split - each year, the size of the leaves start to get smaller. This is usually as a response to the dwindling nutrients in the soil, in particular nitrogen. So splitting and replenishing the soil nutrients go together.
Raspberry canes spread by underground rhizomes but like the strawberry, once a new cane appears, the rhizome can be cut and the new plant lifted (preferably after it has gone dormant in late autumn / early winter)
I personally have never propagated fruit bushes such as the gooseberry or currant bushes (white currant, red currant and black current) from hardwood cuttings, but I can't see why not.
Herbs are often propagated from cuttings - sage, thyme, mint to name a few.
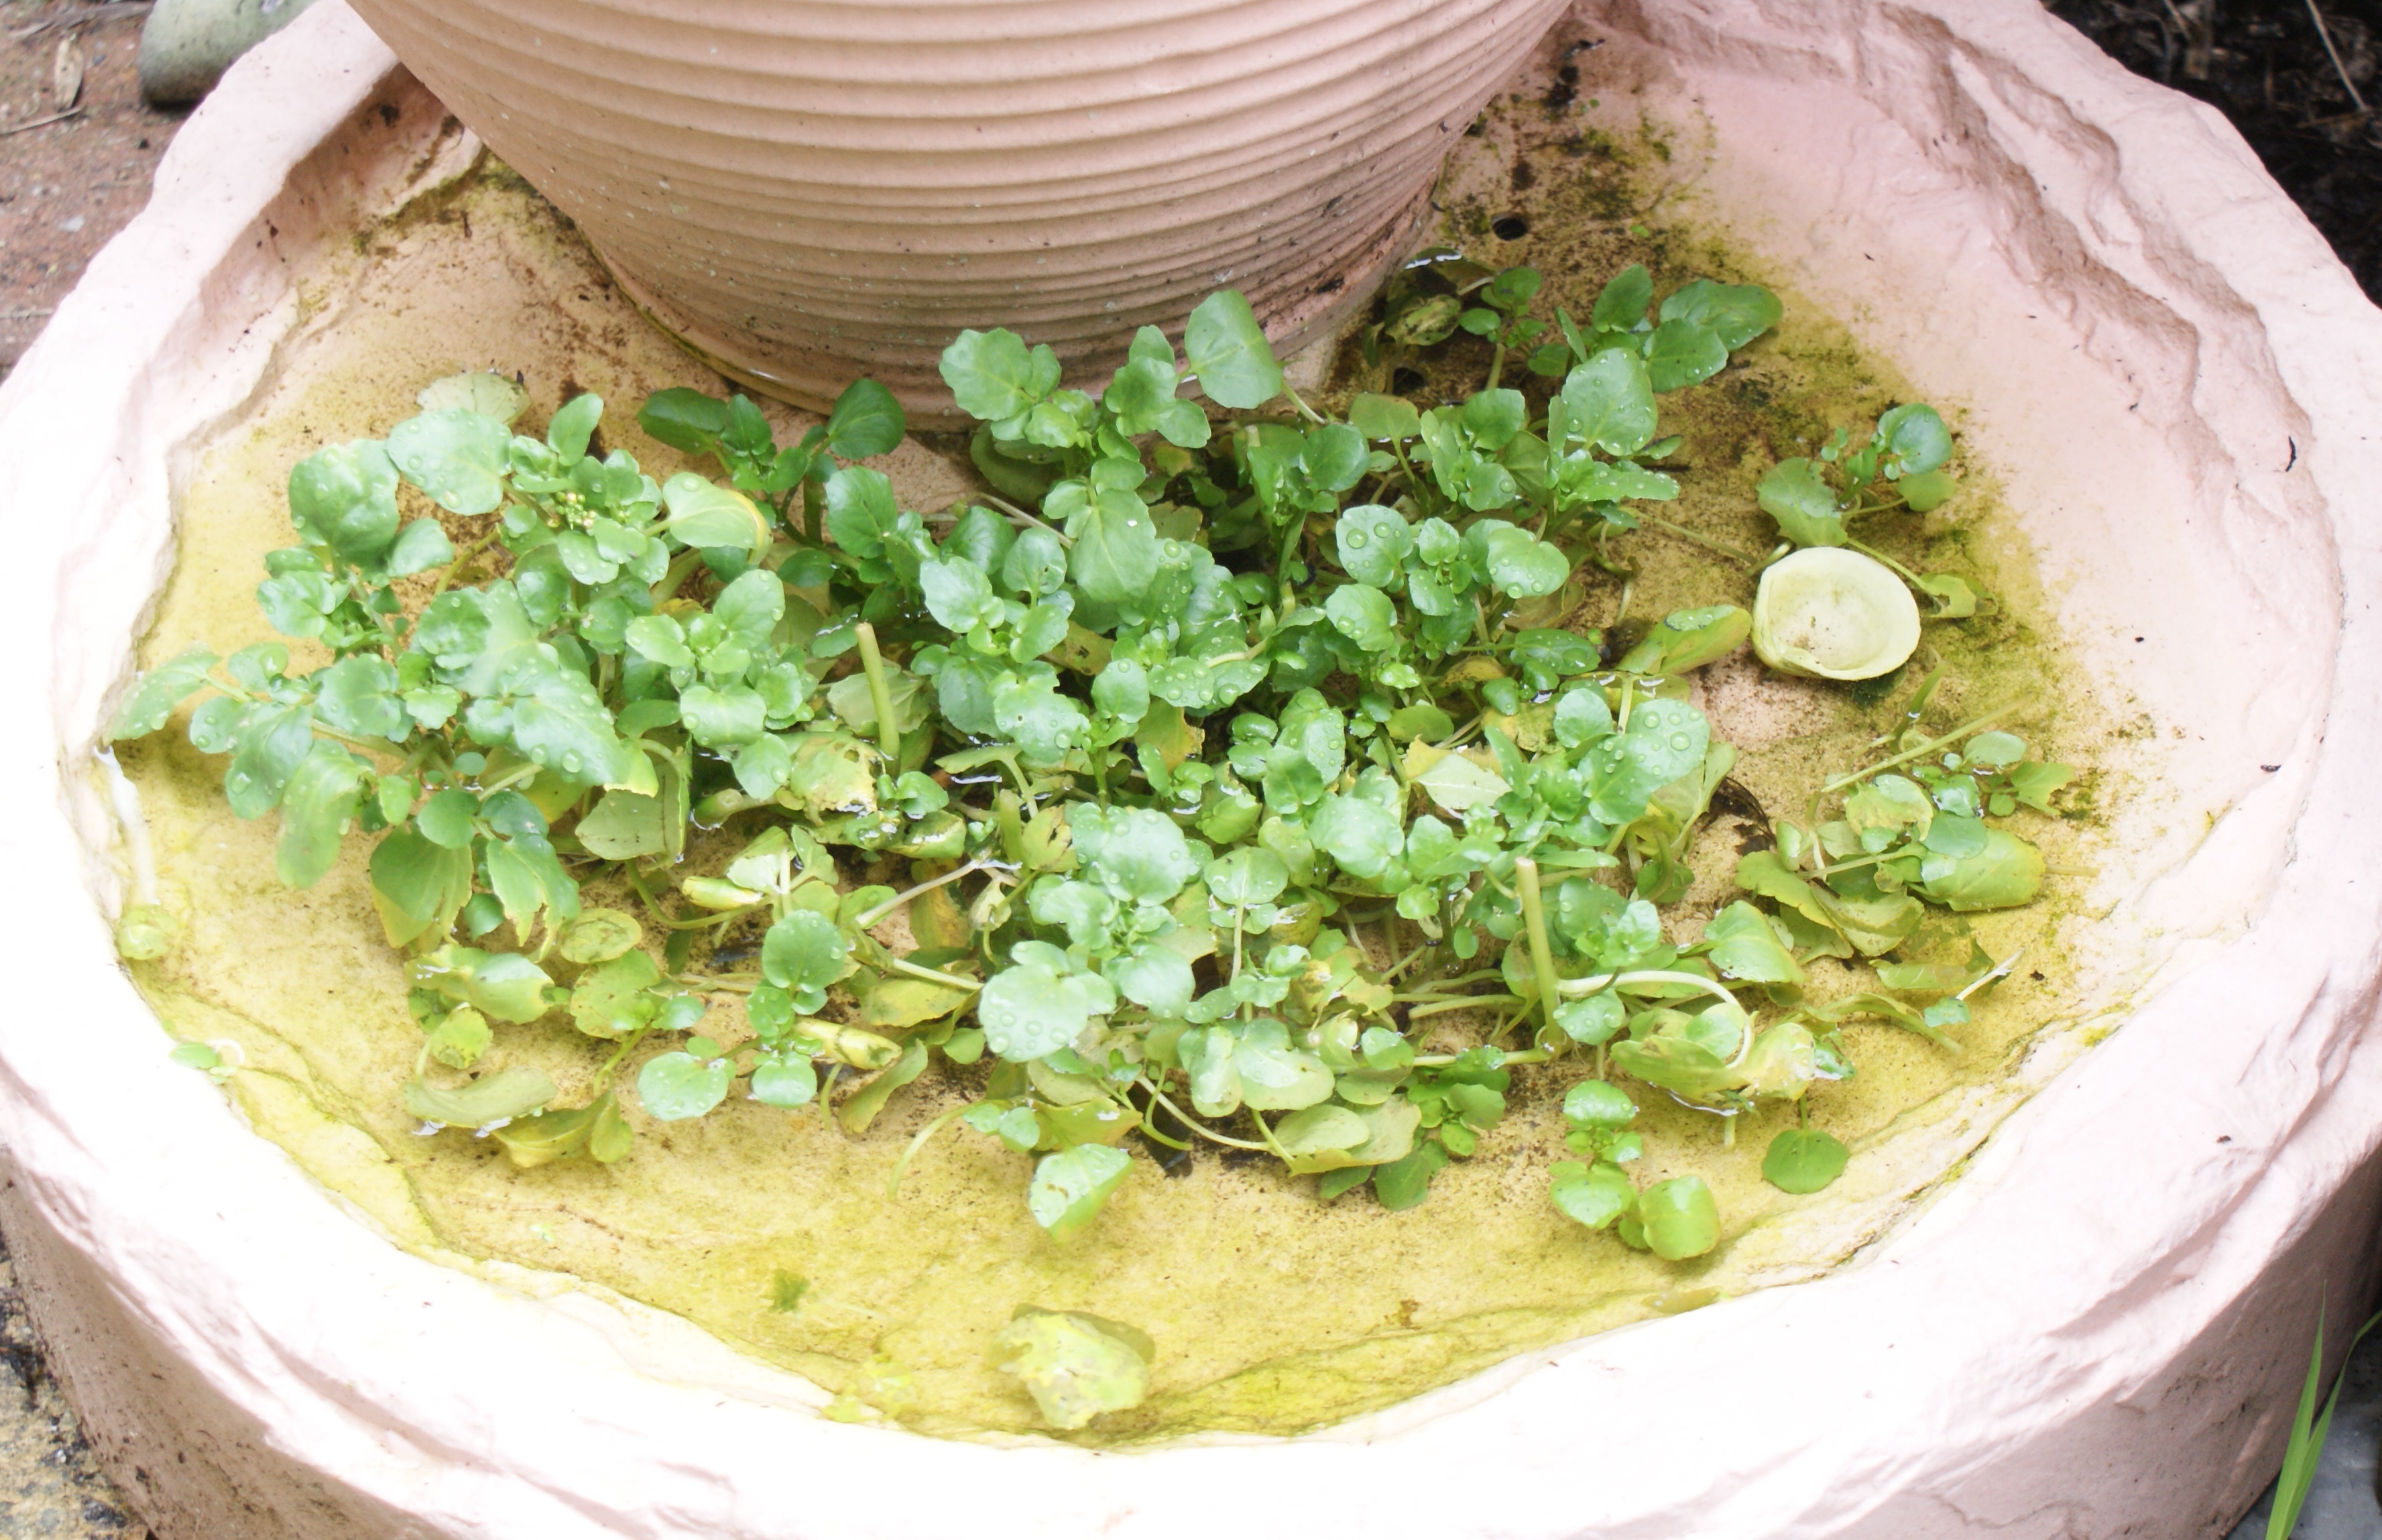
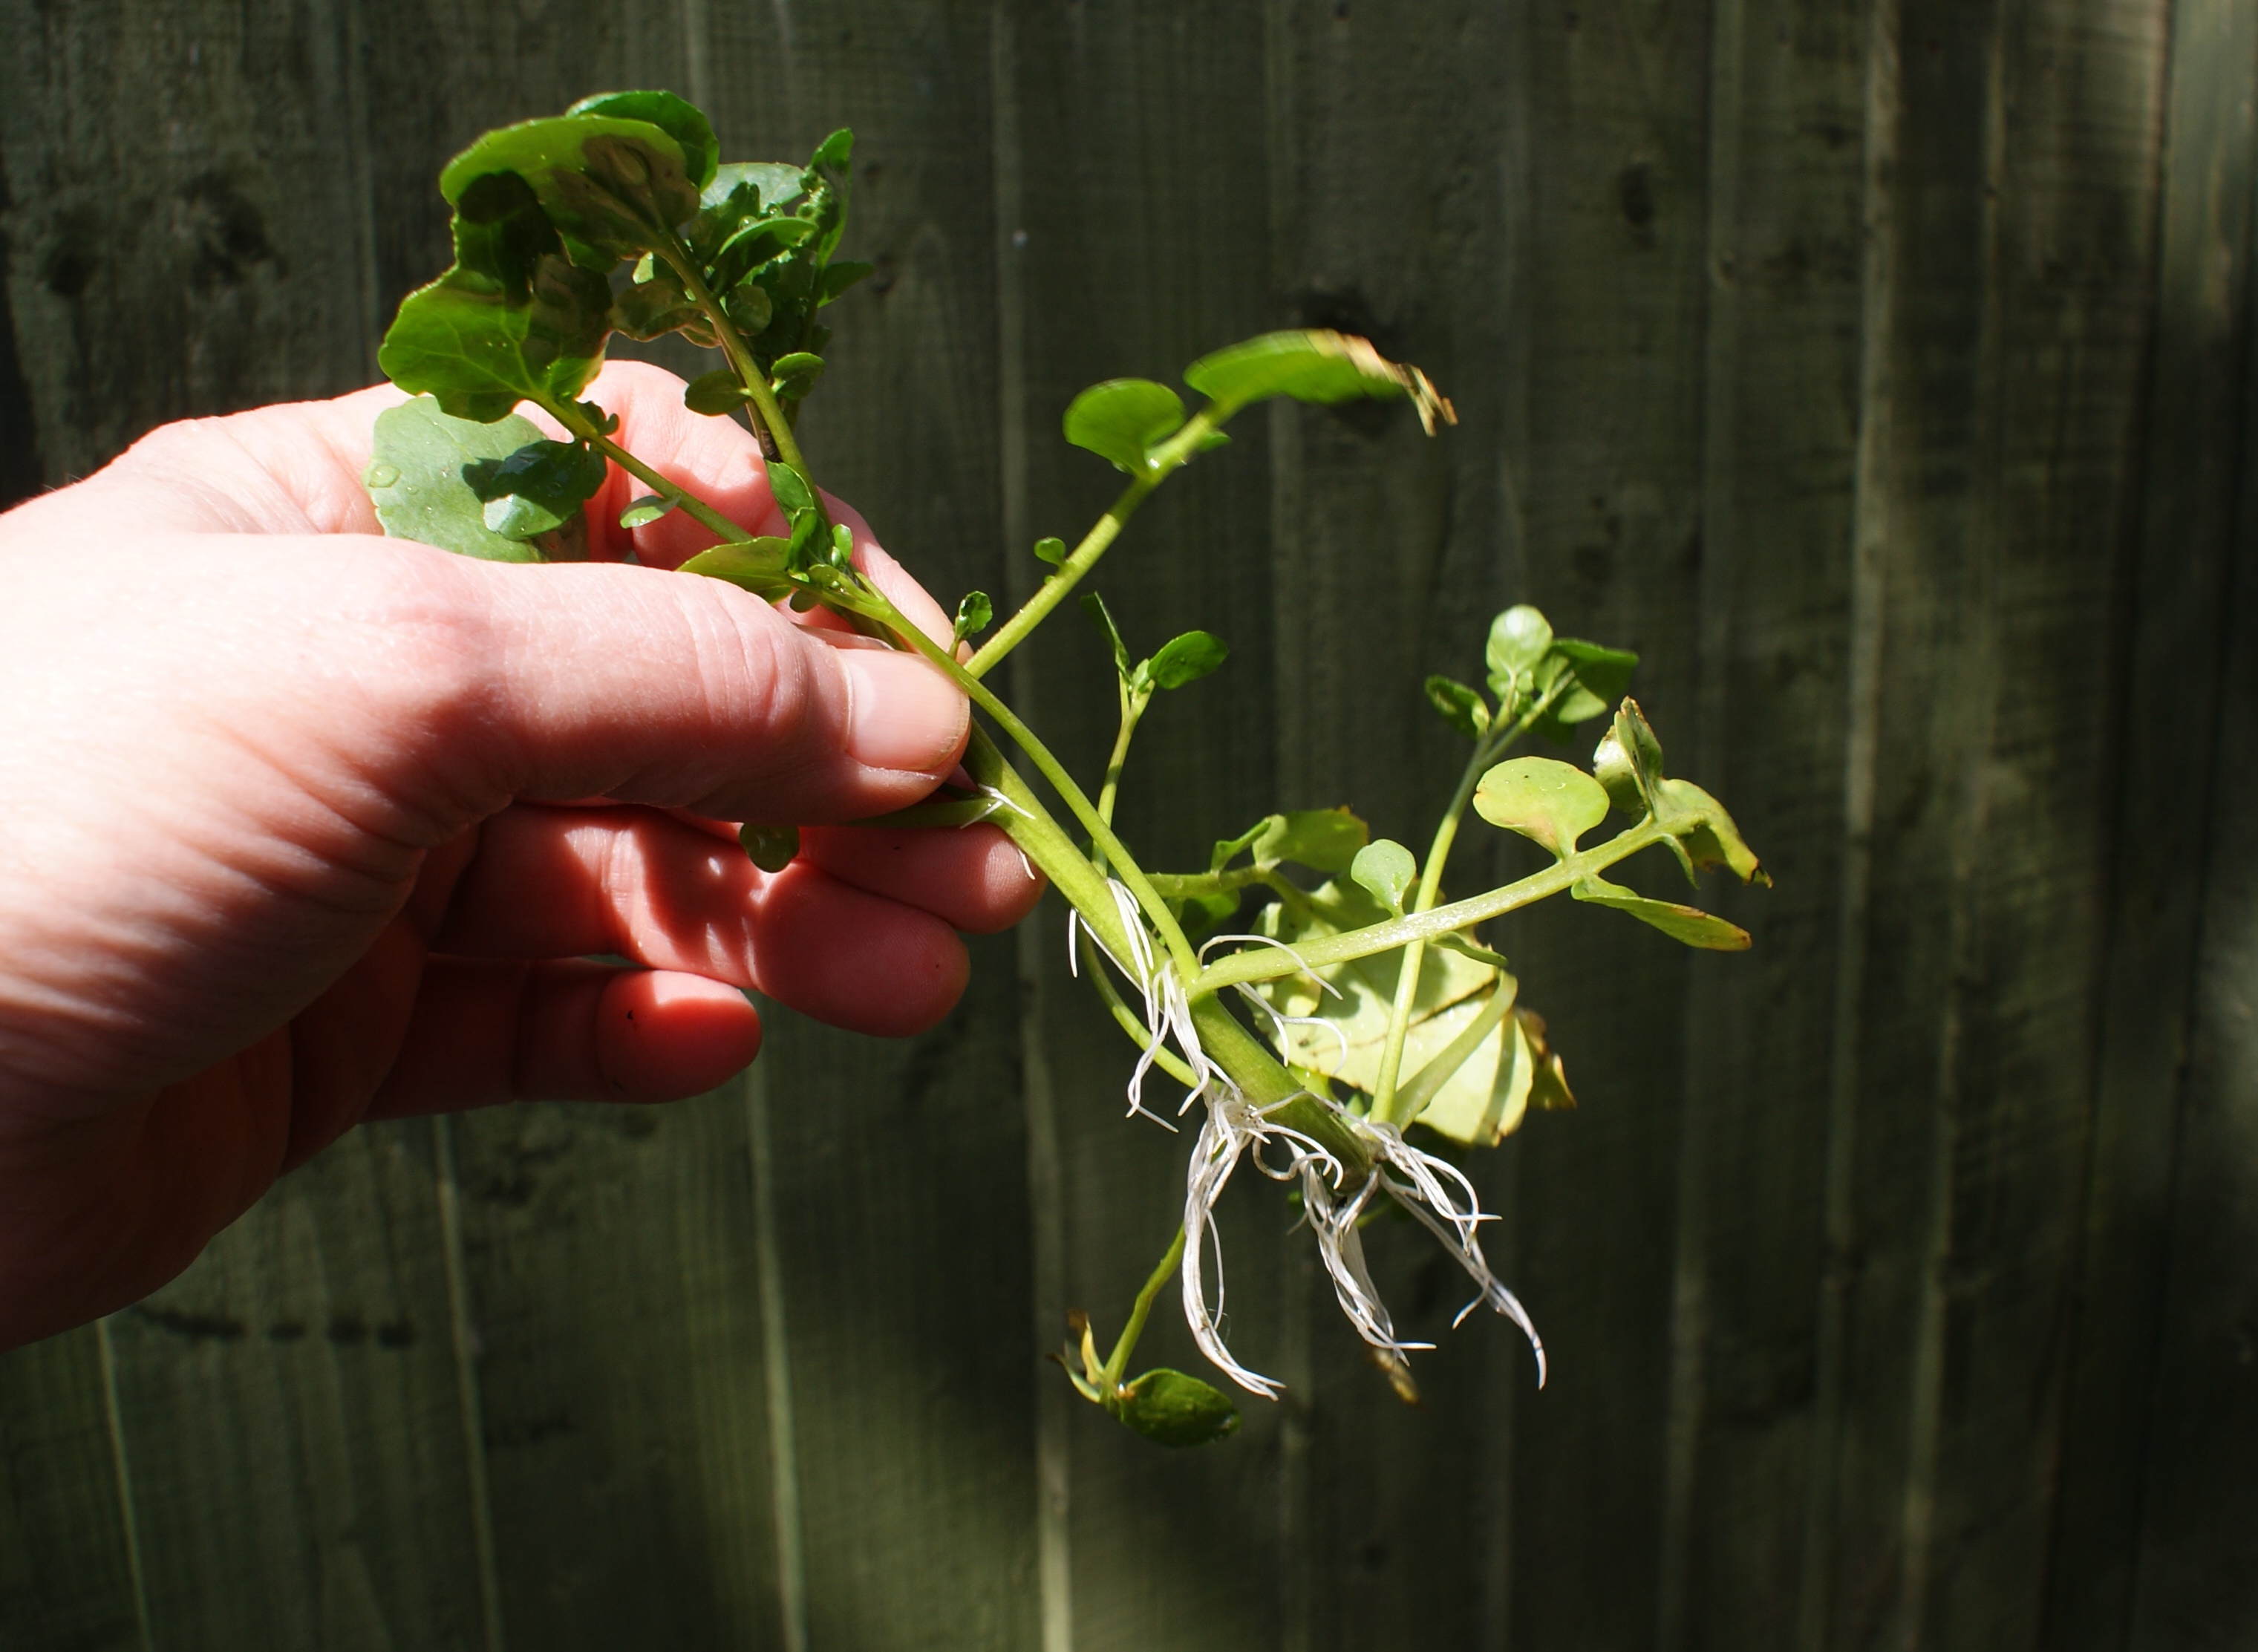
One successful and easy crop to grow was watercress sold in the supermarket (washed and packaged in plastic ready to eat) I learned about this method when I had a fish pond and was a bit concerned about the growth of algae (green water) Watercress is such a fast growing plant that it can be used to "mop" up excess nutrients (like nitrogen and phosphates) from fish poo - as watercress absorb these nutrients from the water, it deprives algae from multiplying ... of course, the biological process is not as straight forward as it sounds. Still, in terms of a harvestable crop throughout summer, I reckon watercress has to be a winner. You don't need a pond but it would help to have trays or crates of fresh water - simply tip the supermarket prepared watercress into the water and roots will grow from the stems in just a few days.
I usually catch the typing errors soon after posting but just occasionally one or two slip through and then it is too late to correct.
In the paragraph about the New Zealand oca / yam, the word "harvests" should read frost :
lancashire lass wrote: ↑13 Feb 2023, 16:22
The trick to a good harvest is to wait until the first autumn harvests kill off the top growth - and then wait some more.
And in the paragraph about splitting the rhubarb crown, "space" should read spade :
lancashire lass wrote: ↑13 Feb 2023, 16:22
Use your foot to apply force to the space to slice into the crown.
This thread is supposed to be about saving money by growing your own so when it comes down to herbs, growing from seed or buying from a garden centre are not always the cheapest ways to grow your own herbs.
For example, why buy a packet of seeds when you only want one or two sage bushes, a clump or two of chives or a couple of thyme shrubs? Instead, have a good look at the potted fresh herbs you can buy in the veg section of the supermarket. Select the ones that look more compact (not tall and leggy) than the others and as soon as you get them home, split the plants and pot up into fresh compost. You have to be very gentle as the plants are tender (they are after all grown and sold for use in the kitchen straightaway)
The easiest way to split is to first remove the plants from the pot (with one hand, turn the pot upside down and gently squeeze the pot to help loosen the plug while using your fingers on your other hand to support the plug as it falls out) then place the compost / root plug into a bowl of water. Leave it for about an hour and then gently tease the roots apart from each other and plant each one in a pot. You will get quite a lot of plants from a single purchase. Let them recover somewhere bright but not in direct sunlight - it may take a couple of days but you'll see the plants perk up. Then try to harden them off as soon as possible - avoid hot sunny days and wind, and only for an hour or two at first. Make sure the compost is kept moist.
When it comes to chives, then you don't need to plant individual plants but can just break the plug apart so each clump has a half dozen chive plants or so.
When the plants have hardened off, they can be planted in their final bed or container. If growing basil in a greenhouse or polytunnel (basil is a good insect repellent and often planted with tomato plants), you can forego the individual planting and hardening off as before and put in their final planting area soon after splitting. Don't forget that greenhouses and polytunnels can get a lot warmer when the sun is shining so do keep the compost well watered until the plants have recovered.
Personally I don't like fresh coriander (it tastes like soap to me) but I can't see any reason why the same method can't be applied. On the other hand, if you do like a lot of fresh coriander, it may be cheaper to grow from seed.
It makes sense to me to have sage, thyme and rosemary, at least, growing perennially in the garden. Its painful to see small sprigs in cellophane for sale for £1.75 or more in supermarkets.
PK wrote: ↑16 Feb 2023, 10:01
It makes sense to me to have sage, thyme and rosemary, at least, growing perennially in the garden. Its painful to see small sprigs in cellophane for sale for £1.75 or more in supermarkets.
You do get a lot of "sprigs" in a fresh herb pot in the supermarket - as mentioned in the post above, if you are careful you can get quite a lot of plants from one purchase whereas if you went to a garden centre, a single plant would cost perhaps more.
I thought the basil was great value for money when I teased the plants apart and planted them all in the polytunnel with my tomato plants. I easily got over 20 plants from just one purchase. They were a bit delicate at first so were heavily watered for a few days but when they recovered, they were incredibly hardy.
Yes, I agree with supermarket pot grown basil, parsley etc it can be very economical to separate and pot up to grow on. I was thinking more of the hard wood shrub herbs like rosemary and sage where you get a couple of stalks.
Bare rooted asparagus should be available in shops and online seed & plant suppliers. These are usually one year old crowns which are bested planted in fertile soil with good drainage. There is a specific way of planting them which involves digging a trench, and then creating a ridge in the middle on which the crown sits and the roots are positioned either side - see link to Gardeners World on how to grow asparagus.
Asparagus is an investment crop where (i) it costs a little more than you might expect and (ii) it takes time for the spears to develop into the familiar ones you see in the supermarket. This usually takes 2-3 years before you start to crop anything but thereafter, the yield should increase in the following seasons. You can grow asparagus from seed (which is obviously cheaper, and there are usually lots more varieties available than when buying crowns) but it does require a lot of time, effort and care (protecting the seedlings from slugs and snails and moving them on to their final beds and so on) but can be worth it.
The spears you see in shops are the growing tips which emerge from the soil in early-mid spring (I can remember waiting for an appearance in the first 2 weeks in May when I first started growing my own, but this seemed to shift to mid-April - I'm not sure if it was because the plants were becoming more mature or a sign of changing weather patterns) The 1st year crown spears are very thin (pencil thin) but as they get older, the spear thickness increases. There is a critical point when they need to be harvested - if you leave it too late, the tip rapidly grows into a stem and leaves burst out into fronds. They really look quite pretty and could easily be disguised as a bedding plant outside of the veg garden. The stem / frond does get quite tall (easily 4-6 feet tall) when mature and are easily damaged by strong winds so a quiet sunny location would be preferable, and if necessary, use a stake to support them.
Asparagus seems to only have one major pest that I know of - the Asparagus beetle. It's a surprisingly pretty bug (black with white spots on the wing case and a red head with stripy black & white antennae) but the sight of them on the asparagus plants is one of dread. And they are incredibly crafty - I knew something was eating my plants (the damage is indescribable destruction to not only the leaves but the stems too) but for the life of me, I could not see anything until one day I just happen to be looking at a spot and saw a movement. The bug knew I was looking for it and hid behind the stem, and as I walked round the bed, it continued to hide at the same time. Even if you do manage to catch one, the chances are the other larvae and beetles will drop off the plant onto the soil, and merely climb back up when the area is safe again. And if you can bring yourself to crush the bug between your fingers ... (seeing the damage done will be anger enough to want to do this) ... they seem to be able to withstand quite some pressure. I have to confess that I had to resort to a systemic pesticide (this chemical is taken up by the plant and kills the bugs that eat any part of it. Usually not a good idea to harvest to eat from it although by this time, the time for harvesting has passed) I also made sure the plants were not flowering at the time. Still, once the asparagus were on the beetle radar, they kept coming back.
A non-chemical option is to grow pot marigold (Calendula, not the French marigold) in the same bed as asparagus. And it worked but I think eradicating the initial numbers was required first, and the pot marigold thereafter acted as a deterrent.